

- Meta title: Roof-To-Wall Flashing Details for Attached Patio Covers
- Meta description: Learn roof-to-wall flashing details that prevent leaks on attached patio covers, including step flashing, counterflashing, kick-out diverters, and low-slope wall tie-ins.
- Primary keyword: roof to wall flashing
A patio cover can look perfect and still leak at the house wall. That leak usually isn’t “bad roofing.” It’s a weak transition where water meets a vertical surface and finds an easy path inside.
The fix is almost never another bead of caulk. The fix is correct roof to wall flashing that sheds water in layers, like overlapping shingles on the roof. When the layers are right, rain runs out and away, even in wind-driven North Texas storms.
If you’re planning an attached cover in Denton or nearby cities, these details help you ask better questions and avoid expensive repairs later.
Roof-to-wall flashing basics that stop leaks (not just drips)

Think of water like a crowd leaving a stadium, it takes the easiest exit. At a roof-to-wall joint, that “exit” is any crack behind siding, any nail hole, or any flashing that points uphill.
A solid roof-to-wall detail uses layering, not hope. Each higher material overlaps the one below it so water can’t run behind the system. That’s the same “shingle-style” idea you’ll see in general flashing explanations, like this roof-to-wall flashing overview.
Here’s what you’re usually trying to accomplish on a shingle roof tie-in:
- Step flashing at every shingle course so water can’t track sideways along the wall.
- Counterflashing (or wall flashing) that covers the top edge of the step flashing, so wind-driven rain can’t sneak behind it.
- WRB (housewrap) integration so the wall’s drainage layer directs water over the flashing, not behind it.
- Kick-out flashing at the eave to force water away from the wall and into the gutter path.
Gotcha: If the detail relies on caulk as the “primary” waterproofing, it will fail. Caulk is a helper, not the roof.
If you’re also choosing materials and aesthetics, the flashing still has to do the same job. High-end structures, including modern cedar patio covers, look best when the waterproofing details are built in, not patched on afterward.
Low-slope patio cover roofs at a wall (metal, membrane, and stucco)
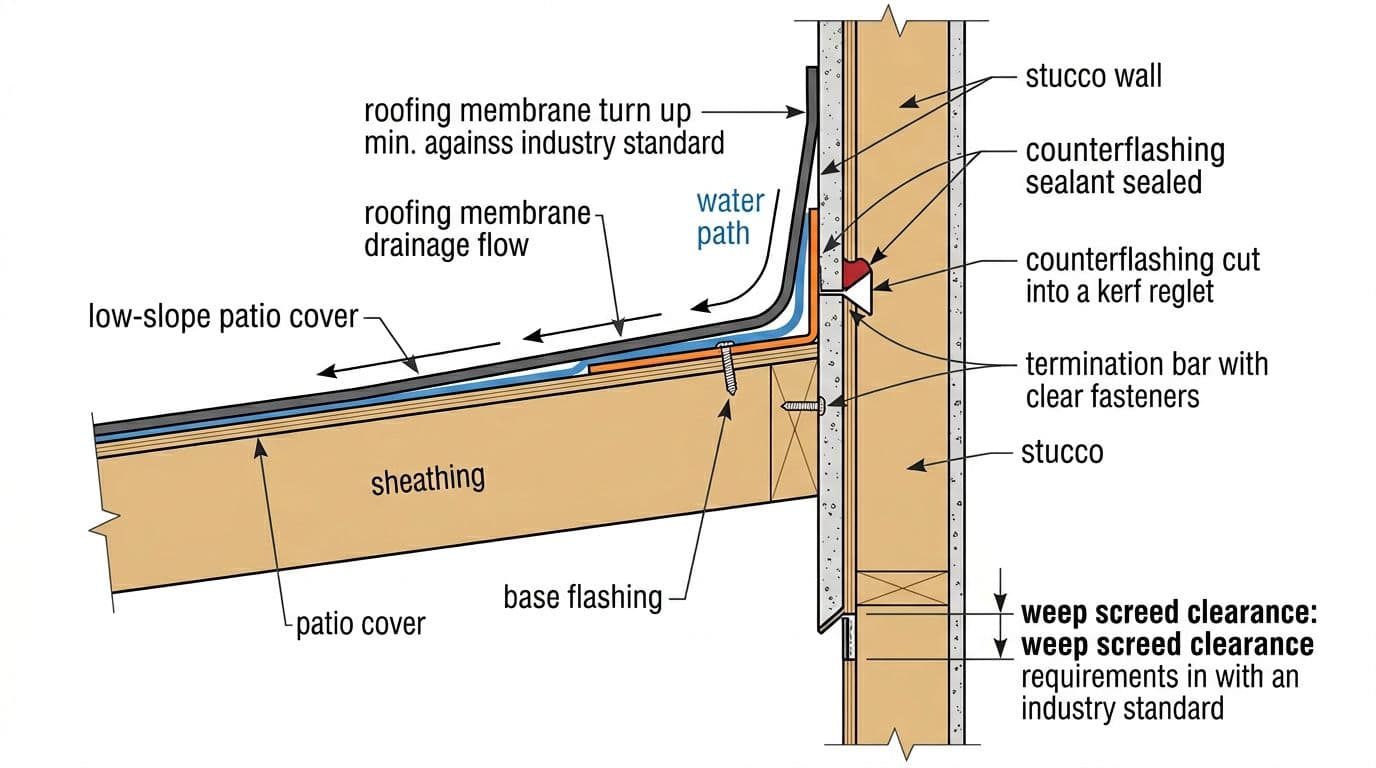
Low-slope attached patio covers fail differently than steep shingle roofs. Water moves slower, so it has more time to work into seams. That’s why a low-slope wall tie-in needs a dependable “bathtub edge,” not a thin strip of metal and a prayer.
If your house has stucco, the best practice often includes a reglet (a cut line in stucco) so counterflashing can tuck into the wall. That creates a mechanical overlap instead of a surface-mounted edge. You’ll also want a waterproofing membrane that turns up the wall, then gets terminated correctly.
Pay attention to these details when you’re reviewing a proposal in places like Flower Mound or Highland Village, where wind and heavy rain can hit the wall hard:
- Base flashing that turns up the wall behind the exterior finish.
- Counterflashing that sheds over the base flashing, not behind it.
- A termination method that stays tight over time (termination bar or reglet, based on the wall system).
- Clear drainage at the bottom of wall assemblies, so moisture can escape instead of wicking upward.
The same layering principle shows up in attached structure waterproofing guidance, including this flashing and waterproofing primer for attached pergolas. Even if your roof is solid, the wall interface still needs shingle-style sequencing.
One more thing: movement makes leaks worse. If footings settle, the roof-to-wall joint can open up and stress sealants. If you’re building new in Argyle or on reactive soils around Denton County, it helps to understand how foundations support long-term alignment. This patio cover footings guide is a practical starting point.
If you want a second set of eyes on your plan before you commit, call 469-340-0839.
Common roof-to-wall flashing failures on attached patio covers (and the fix)
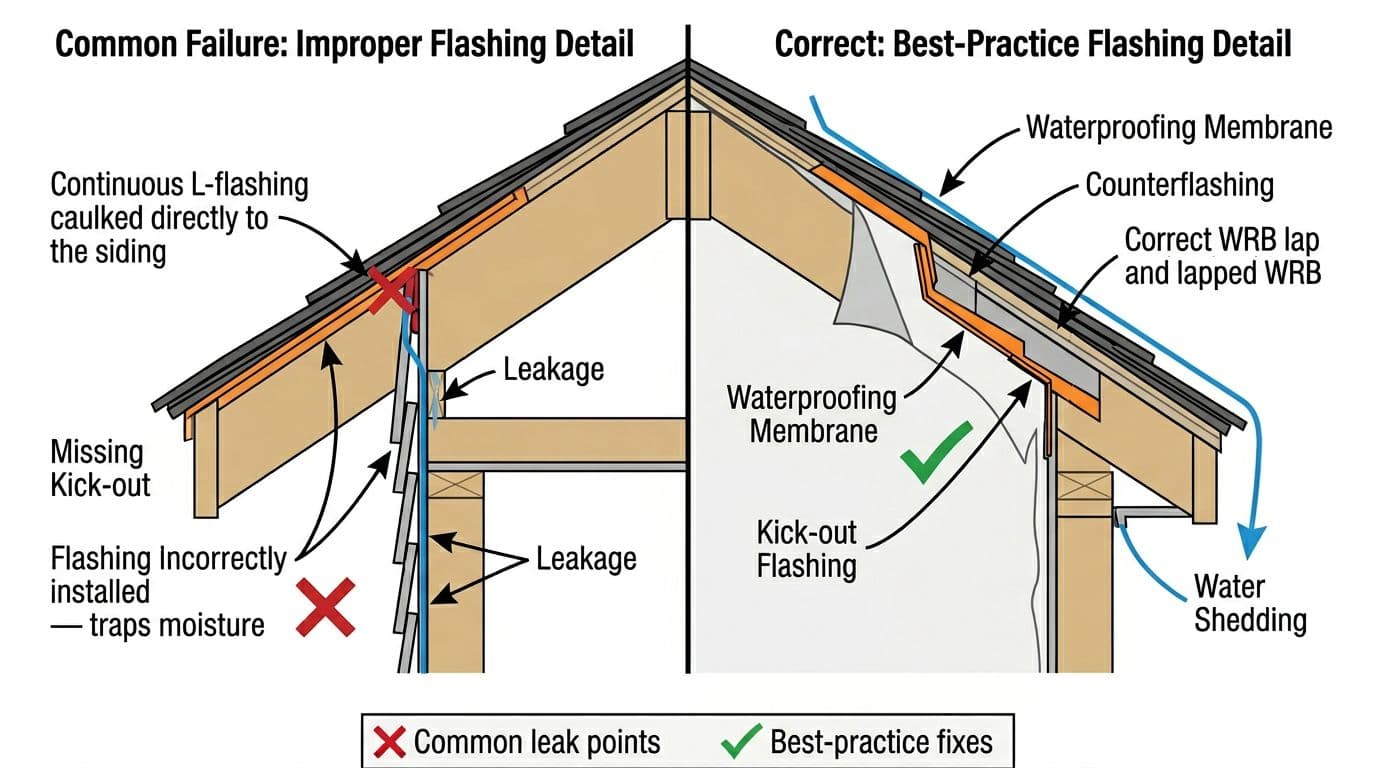
The most common leak detail is also the one that “looks fine” from the patio. Someone installs continuous L-flashing, screws it to the wall, then runs caulk along the top edge. It may hold for a season. Then the caulk shrinks, siding moves, and water gets behind the wall.
You can often spot trouble without climbing a ladder. Watch for stains at the patio cover ceiling near the wall, peeling paint at trim, warped fascia, or a gutter that overflows right at the wall edge. Inside, a musty smell near the back door after storms is a red flag.
Here are failure patterns worth calling out before installation:
- Missing kick-out diverter: Water dumps against the wall instead of into the gutter path.
- Flashing installed behind siding wrong: The WRB should lap over flashing in the correct order.
- Fasteners through the wrong surfaces: Holes in “wet zones” become leak points.
- One-piece flashing used where step flashing belongs: Water can travel sideways and uphill in wind.
If you remember one rule, remember this: water should always land on the next layer down, never behind it.
Because attached patio covers tie into your home’s exterior, it also helps to understand the attachment steps and why the wall gets opened up during proper work. This attaching a patio cover to a house guide gives you a plain-language view of what’s involved. For larger builds around Frisco, Plano, or Lewisville, the roof area increases the consequences of small mistakes, so details matter even more. If you’re planning a bigger footprint, this 16×20 cedar patio cover guide can help you think through layout, roof design, and tie-in planning.
PAA-style Q&A: roof-to-wall flashing for attached patio covers
What is roof-to-wall flashing on a patio cover?
It’s the flashing system where your patio cover roof meets the house wall. It redirects water onto the roof surface and away from the wall assembly.
Is caulk enough to stop leaks at the wall?
No. Caulk can seal small gaps, but it can’t replace a layered, overlapped flashing system. Sun and movement will break caulk over time.
Do you need step flashing on an attached patio cover with shingles?
In most shingle-to-wall conditions, yes. Step flashing at each shingle course helps prevent sideways water travel along the wall.
What is kick-out flashing, and why does it matter?
Kick-out flashing is a small diverter at the bottom of the roof-to-wall run. It forces water away from the wall and into the gutter flow, which helps prevent rot and stains.
Can you flash an attached patio cover without removing siding or stucco?
Sometimes you can, but it’s risky. Proper details often require integrating with the WRB behind siding, or cutting a reglet in stucco for counterflashing.
When should you call a pro instead of patching?
Call when you see recurring stains, soft wood, bubbling paint, or wet drywall. You’re often dealing with a hidden wall-water issue, not a surface drip.
Conclusion
Leaks at an attached patio cover usually start at the wall, not the roof field. When your roof to wall flashing is layered, lapped correctly with the WRB, and finished with a kick-out, water has nowhere to go but out. If you want a Denton-area builder to review your tie-in details before problems show up, call 469-340-0839.